
Among my many frustrations with using a media center setup in our home in the Philippines is the inability to watch streaming movies and tv programs from the US, apparently due to some licensing issues with countries outside the US. I thought If I only could find a way to watch streaming videos from Netflix and Hulu and a few other websites, my media center would be perfect, and that I can already have my cable subscription terminated.
If you are living outside the US, Netflix and Hulu (and the others) would normally prevent you from watching streaming videos from their site, as they block IP addresses that do not originate from US. One work around to this is to use a VPN service that will hide your IP address and make you appear to be in the US.
I googled and found a few vpn services, some are free, some are paid, but the best that I found, in my opinion, is Hotspot Shield. Its is small in size, easy to use, and it's free. The only thing I didn't like with it is the advertisement banners it generates on every webpage you open. I don't blame them, they have to do it to be able to provide that "free" vpn service that we all want.
While I am totally ok with the advertisements Hotspot Shield generates (if I want to use their service, I had to support them by at least looking at their ads), I thought I could experiment and find a way to eliminate the banner ads and make the web pages look normal again.
Here's what I did to remove or block the advertisements from AnchorFree, provider of Hotspot Shield, the free VPN software that I used to hide my IP address and make myself appear to be in the US, thus allowing me to watch streaming movies and tv programs that are usually only allowed to residents of the United States (due to some licensing issues with other countries)
First, I edited my hosts file and added a few websites that I want blocked. I did it by opening notepad as administrator (right click on Notepad shortcut and click on Run as administrator) and opening the hosts file found in C:\Windows\System32\drivers\etc (change the file type filter from text files to all files to see the contents of the folder). Once loaded into notepad, add the following entries to the bottom of the file then save and close it afterward:
127.0.0.1 box.anchorfree.net
127.0.0.1 rss2search.com
127.0.0.1 a433.com
127.0.0.1 bannerfarm.ace.advertising.com
This trick removes the advertisement banner that usually appears on the top of the browser screen whenever Hotspot Shield is running and connected to their server. This also gives you a blank page instead of the box.anchorfree.net page the Hotspot Shield client redirects to after connecting to the server. This trick alone is enough already to remove the advertisements being forced by AnchorFree into every webpage I open.
While at first already satisfied with the result, I thought I could use the redirect trick AnchorFree is using to bring up advertisement pages. I went back to opening and editing my hosts file and modifying the first entry that I made. Instead of using 127.0.0.1 (which is equivalent to localhost) as IP address for box.anchorfree.net, I changed it to 208.75.76.17, the IP address of Netflix.com, my favorite website for watching movies and tv programs. That way, whenever I connect to Hotspot Shield, the client automatically redirects me to Netflix.com's homepage.
Tuesday, November 9, 2010
Wednesday, July 1, 2009
DIY Snoot and Grid Tutorial Part 2
This is the second part of our DIY Snoot and Grid Tutorial. If you have not read the first part yet, you can find it here. This part of the tutorial will deal with making the black straw grid to use with your strobist kit. The materials and tools are already enumerated in the first part, so if you have already done the snoot and are just following up for the grid, you should already have the materials and tools ready with you.
We are making a 6cm snoot, so cut a piece of the plastic sheet 6cm wide and 21.5cm long. Mark the plastic sheet where you will make the folds as follows: 6.5cm, 4.5cm, 6.5cm, 4.5cm and finally 6.5cm. As with the snoot, there will be two 6.5cm's that will be taped together.
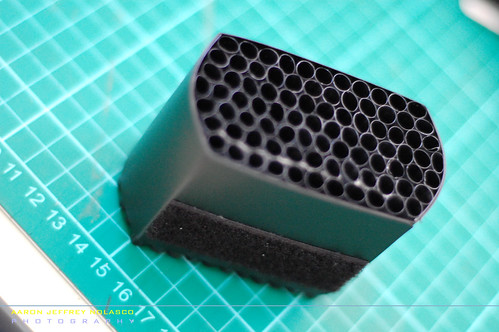
Cut 6cm length of black straws. I exactly used 86 pieces of 6cm straws, which i cut from a handful of black straws about 8 inches long and 6mm to 7mm in diameter.
Make a box out of the strip of black plastic strip by taping together the two 6.5cm ends using double-sided tape.

 It's now time to lay the straws to make the gridwork. Start by putting two strips of tape on the inside part of the wide side of the box, then lay one layer of straw on the tape, making sure the ends of the straw are flush with the end of the plastic sheet. Instead of the double sided tape, you may also opt to use silicone sealant of the type used for sealing cracks and gaps on window sills. After laying the first layer of the straw, lay another strip of tape over the straw layer, or silicone sealant if it is what you want to use. Continue alternating layers of adhesive and straws making a honeycomb pattern. I used 11 pieces of straw on the first layer, followed by 12 straws, then followed by 13 straws, then 14 straws, then 13 straws, followed by 12 straws, and lastly, 11 straws.
When are done making the grid, tape a velcro loop strip on each side of the grid, as shown in the picture.
If you have followed my instructions in making both the snoot and the grid, the grid should be just the right size to slide inside the snoot. As you may discover, the grid piece is really meant to just slide in and out of the snoot, as if it can be zoomed in and out. Zooming the grid piece in or out can make for a tighter or broader beam of light. The design will also allow you to use colored gels easily with the snoot and grid. You may also decide to make a longer or shorter snoot and/or grid, which will give you different results. The beauty of doing things on your own is that you can experiment as you wish as you go along.
I hope you enjoyed following along with my tutorial. Watch out as I may post some more in the future. Post your comments so I will know if you liked (or disliked) my tutorial, or if you have any suggestions so I can make the tutorial more meaningful and useful.

Friday, June 26, 2009
The Ruins
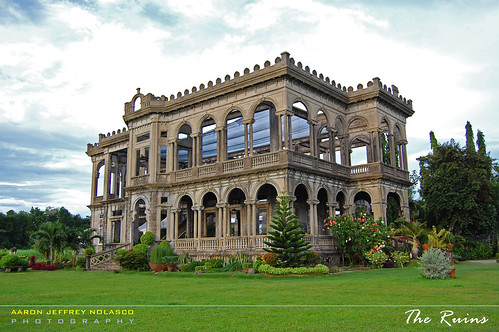
June 26, 2009 - Bacolod City
During one of our trips to Bacolod City, where my wife is from, we decided to visit one of the infamous places in Negros Occidental. The remains of a beautifully built mansion owned by the wealthy Lacson Family in Negros, "The Ruins" as the locals call it, has been a favorite destination in Talisay City, a few kilometers north of the "City of Smiles".
We left Bacolod City at about 4:20 in the afternoon, right after my wife and I went out of the Grand Regal Hotel where we attended a food convention earlier in the day. As a photography enthusiast, I can't help but notice the abundance of beautiful scenery the place has to offer. The city itself is full of great subjects for photo journalism, and as one moves to the country side, the city scape would gradually shift into a treasury of beautiful landscape. Trees, old houses, and wide expanse of sugar cane farms would soon replace the common city sight of commercial establishments and jeepneys. A couple of kilometers away from The Ruins, you may already be able to see the tree sitting on the top of the obelisk-looking tower marking the spot where the villa's entrance is.
We arrived at the spot at about 4:40 PM, which I thought is just the perfect time for taking pictures of the beautiful ruins of a once grandiose building standing amidst sugar cane farms. The sky is an awesome mix of blue and feathery white casting just the perfect amount of light for such a beautiful photography subject. A bit of orange and yellow hues were already showing up, which I thought added a more dramatic feeling to the scenery. We all found ourselves amazed at the beauty of the place. The beautifully manicured lawn, the perfectly landscaped garden, the elegant fountain, even the mini-golf course all added to the wonders of the once desolate building after the guerrillas burned it during the second world war, in their attempt to prevent the Japanese from making the mansion their garrison.

When we arrived, we found out that a small group of tourists were already in the area. My wife, my son, and my in-laws ran toward the building as soon as they got out of the car, in great excitement. The guard who greeted us at the gate also told us Albert Martinez, who plays the character of Mayor Enrique in the television series May Bukas Pa (Santino), is also inside The Ruins, which increased the excitement level of my wife and her mom a hundred times, which is way more than the zoom capability of my camera's kit lens.

Celebrities, politicians and wealthy and famous business people are a common sight at The Ruins. My father-in-law, who works for one of the great grandsons of Don Mariano Ledesma Lacson, the sugar cane baron who owned the famous edifice, even mentioned of a luxurious lunch hosted by Gloria Macapagal-Arroyo for her friends at the garden of the mansion's remains.
After taking pictures of the place and of my family (and a couple of shots of my wife and her mom with Albert Martinez), we headed back to Bacolod City. It was about 6:00 in the afternoon, the sun is just setting down the west, and we decided to drop by the pier to photograph the sunset. When we arrived in the area, a number of photographers are already there. I took a few shots, then we drove to the new capitol building site, where we had our dinner at one of the small restaurants there.
Planning to visit Bacolod City? I suggest you put The Ruins on your places-to-visit list. It is one of the best places I've visited in Negros Occidental.
Here’s a quick trip. From Bacolod City, just ride a jeepney going to Bata, fare is only Php8.00. Just tell the driver to drop you off at Rose Lawns (cemetery). From there just ride a tricycle, fare is only Php10.00. If you are in groups and don’t want to spend more, try walking the 2.4-kilometer distance. You’ll walk through a subdivision and at the end of it is a sugar cane farm. If you see an old tower with a tree on top of it, it means you’re already very close to The Ruins.
As you enter the place, you will be welcomed by one of the receptionists. You will have to pay an entrance fee of Php35.00/head. These guys are cool; they know how to take your pictures. They are friendly as well.


Wednesday, June 24, 2009
DIY Snoot and Grid Tutorial Part 1
 After reading some instructions on the web and getting ideas from others on how to make a snoot for a flash gun, I decided to make one for myself, using readily available materials. I made several modifications to the snoots described here and here by using slightly different, and better materials, making for a more professional and durable finish.
I used the following for my DIY Snoot and Black Straw Grid. I am pretty sure you can easily find them in your local sources.
1 pc Black Legal Size Plastic Folder (from your office supplies store)
25 - 30 pcs Black Straw (from the supermarket or from your favorite resto or cafe)
1 roll Double Sided Tape (I used the thin one, not the foam-type mounting tape)
24 inches of black Velcro Tape
I also used the following tools when making the snoot and grid:
Ruler
Scissors
Cutter
Cutting Mat
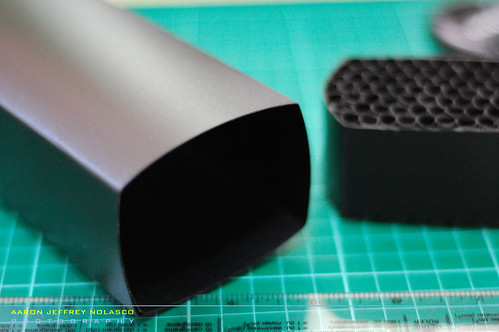
I started by making the snoot first. I cut the plastic folder in half along the fold, and set one of the halves aside for future projects. I am planning to make a 6-inch snoot so I cut the plastic sheet first into into a 6-inch by 13-inch size. I then measured my flash gun (Nissin Di622) to get the right measurement for the snoot. Based on my measurements, I marked the plastic sheet where I will have to make the folds, as follows: 7cm, 5cm, 7cm, 5cm, 7cm. Note that there are three 7 cm parts, as two of them will overlap. The finished snoot would measure 7cm by 5cm by 16cm (6 inches). I also cut 24cm length of the velcro loop (not the hook) tape which I taped into one end of the plastic sheet with the double-sided tape. I then also taped the two 7cm sides together with a liberal amount of double-sided tape.
Here's the finished snoot.
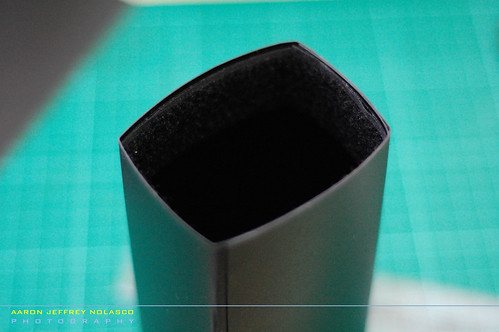
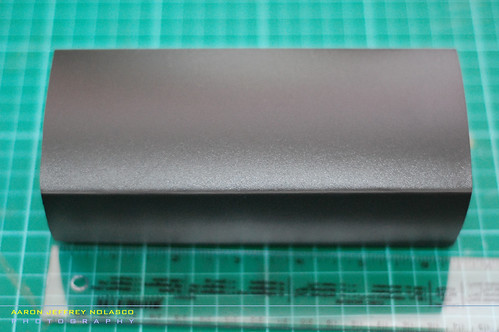
One end of the snoot has a velcro strip which helps the snoot fit snugly into the flash head. The snoot end without a velcro strip is where the grid piece will go into. Now that we are already done with the snoot, let us proceed with the grid piece, which will complete the snoot and grid combination. Click here for the next part of the tutorial.
>>> Part 2 - Black Straw Grid <<<
Subscribe to:
Posts (Atom)